Drawing in a sketch
A sketch holds lines, arcs, circles, splines and curves, and the relations and dimensions that fix their sizes and positions. Lengths are in millimeters and angles in degrees. A double-click on a sketch’s row in the tree opens it, and New sketch in the Design toolbar starts a new one. Exit at the top of the sketch’s toolbar closes the sketch again.
Working with the tools
A click on a tool starts it, and a second click on the same tool goes back to Select. Esc stops a tool as well. While a tool is active, the status line at the bottom says what the next click does. Tools with options show them in a bar at the top left of the view, for example the number of sides of a polygon. A value typed into such a field wins over the mouse for the next element.
Buttons with a small triangle in their corner hold several related tools. A right-click on the button, or a long press on a touch screen, opens them beside the toolbar. The tool picked there takes the button’s place.
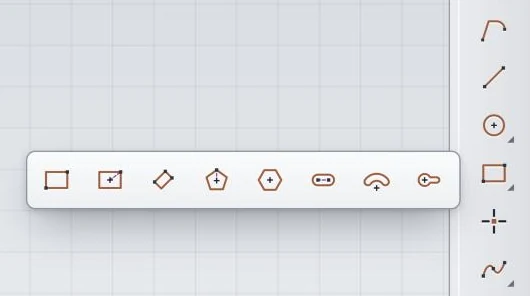
The shapes held by the Rectangle button.
While an element is drawn, its points snap to nearby points and ends, to other elements, to a tangent after an arc, to right angles and parallels, to the horizontal and vertical, and to the grid. Where a point snaps onto an element or an end, the editor ties it there with a relation. Holding Shift turns snapping off.
Lines and arcs
Profile draws lines one after another, each starting where the last one ended. Pressing and dragging at a point draws a tangent arc instead of a line. A click on the first point closes the profile, and a double-click ends it.
Line draws a single line from its start to its end.
Circle takes its center and a point on the circle. Arc takes its center, its start and its end.
Shapes
Each shape comes with the relations that keep it what it is, such as the right angles of a rectangle.
Rectangle by two opposite corners, Centered rectangle by its center and a corner, and Oriented rectangle by both ends of one side and a point on the opposite side.
Polygon by its center and a corner, with the number of sides in the options. Hexagon by its center and the middle of a flat.
Oblong by both ends of its center line and its width. Curved oblong by the center of its arc, its start, its end and its width. Keyhole by the center of the hole, the end of the slot, the slot’s width and the hole’s radius.
Points and curves
Point places a point, for example the center of a later hole. A point placed on an element stays on it.
Spline draws a smooth curve through the points clicked. A double-click, a right-click or Enter ends it, and a click on the first point closes it.
B-spline takes its control points in order, with the degree in the options.
Connect joins the ends of two elements with a curve whose joins are tangent, curvature-continuous or straight. A double-click on the curve changes how it joins.
Curve draws a curve from two formulas, h(t) and v(t), over a range of t. The formulas may use the part’s parameters and the sketch’s dimensions, and a double-click edits them.
A double-click on a finished spline opens its points. Each point has its position, and it can take a tangent angle, a tension at that tangent and a radius of curvature. An empty tangent leaves the direction free. The style is quintic by default, and only this style takes a radius of curvature. The other two styles are averaged and clamped. While the values change, a dashed curve shows the result, and Apply takes it.
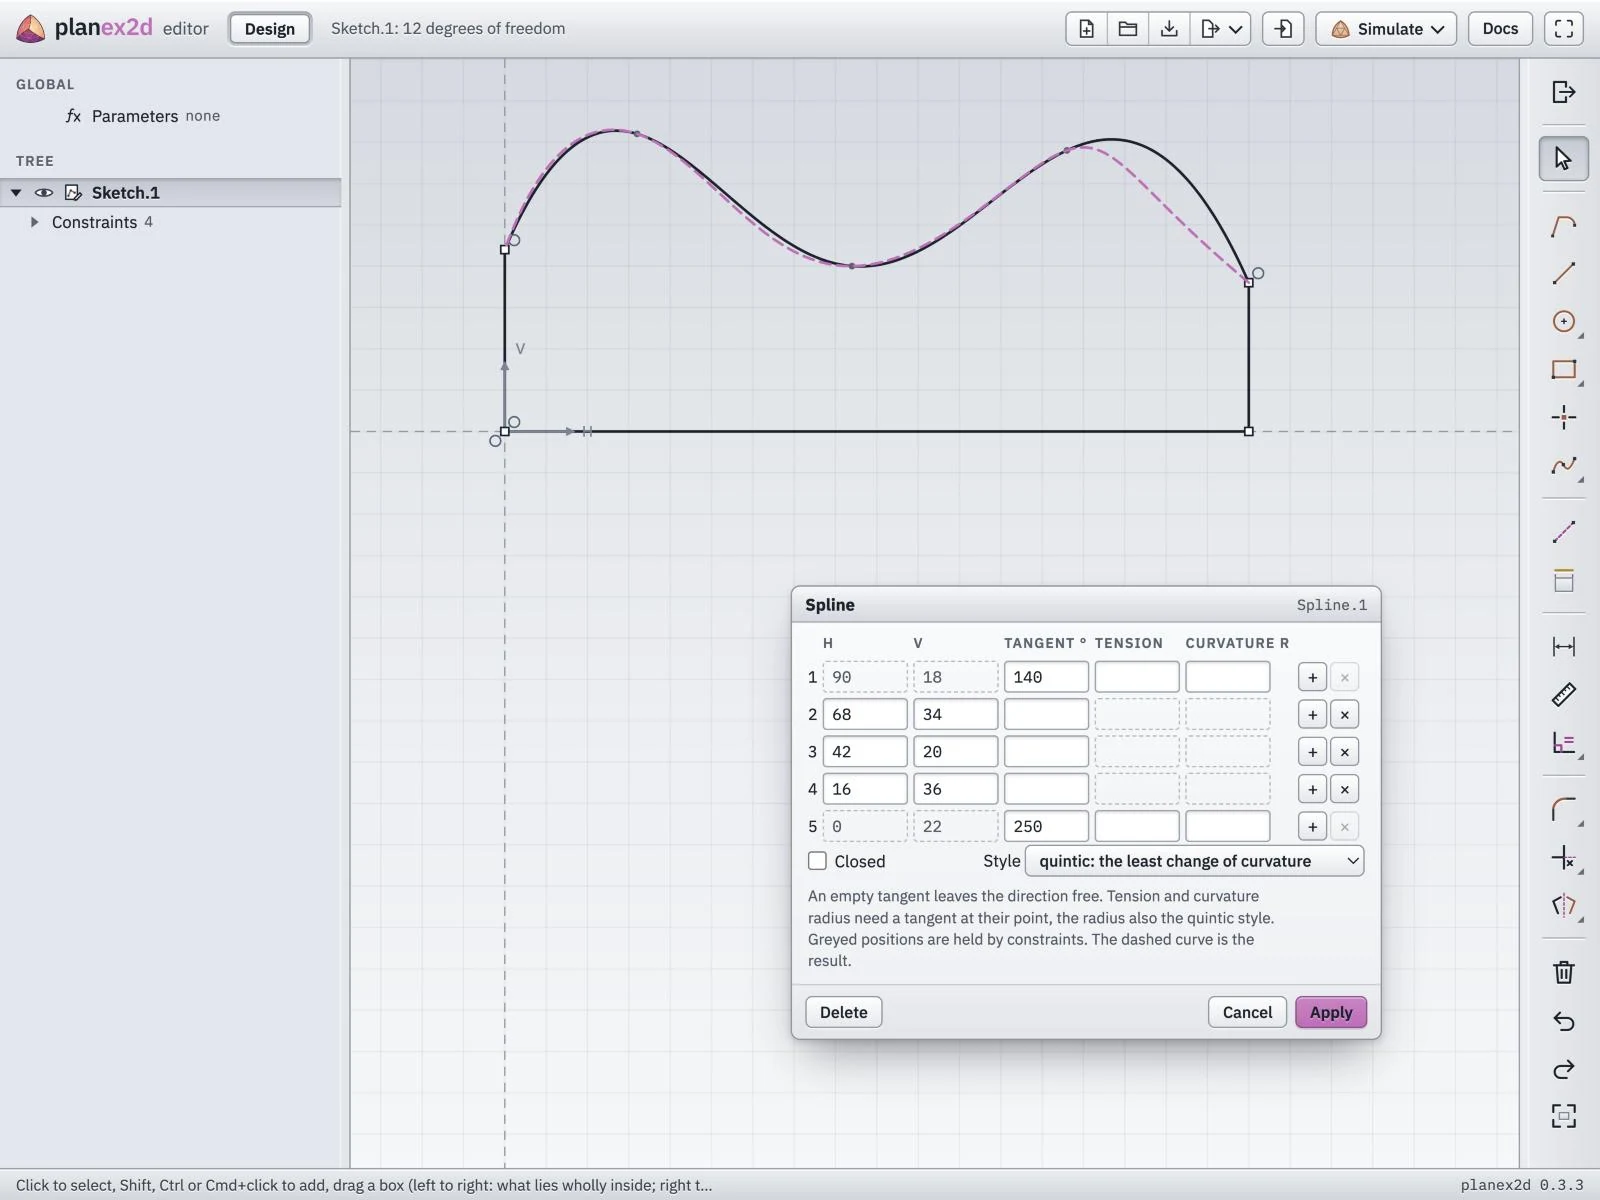
A spline with a tangent angle typed at both ends. The dashed curve is the result before Apply.
Construction and references
Construction turns the selected elements into construction elements, drawn dashed, or with nothing selected, makes the next elements construction elements. They hold relations and dimensions but are no part of faces and files, like the center lines and pitch circles of a drawing.
Project brings edges of other sketches and of earlier results into the sketch as fixed references, drawn in gold. They follow their source when it changes.
Selecting and moving
Select picks an element with a click, and Shift, Ctrl or Cmd adds to the selection. A box dragged from left to right selects what lies wholly inside it, and a box dragged from right to left selects whatever it touches. Where several elements lie under the cursor, ArrowUp and ArrowDown step through them, and Enter takes the one highlighted.
Dragging a point, a line or the edge of a circle moves it as far as its relations allow. The elements that end at a dragged point stretch and turn with it, and the rest stays where it is unless a relation moves it. Shift drags without snapping. The wheel zooms, a drag with the wheel pressed or with the right button pans the view, and Fit shows the whole sketch.
See Quick sketches in the planex2d docs for the drawing calls behind these tools.